Showing posts with label Blogger. Show all posts

Saturday, 2 February 2019

Start of the year: teaching values to set your expectations for the year


In my opinion, there are two crucial things to begin the school year with - team building activities and values. It is these two things that help students to settle into their new classroom, establish connections with their peers and understand the expectations.

Beginning the year with values (either school or the Key Competencies in NZ) is absolutely imperative for a number of reasons...
  1. It sets up expectations for how you want your students to work and behave for the year.
  2. It will be useful when creating your class contract or treaty.
  3. It can be used to create a meaningful wall display. It is something that the students would have had an active role in creating, which can be used as a point of reference and a constant reminder of the values and expected behaviour your the classroom.
  4. Is a great way for students to start learning how to work collaboratively.

This year at Glen Innes School, we have introduced our brand new school values. They are Responsibility, Effort, Ako, Commitment and Honesty... aka REACH. Since it was our first year with school values, it was super important that students made a connection to them. I expect my students to become role models to the rest of the school in showing the REACH values.  Here is how I have taught them to my classroom.

Bus stop rotation

The purpose: This activity helped students to recognise what they already knew about each of the school values - aka their prior knowledge. It is also a great way to maintain enthusiasm and energy, as students are at each station for a short period of time, and have to get up and move to each station.

Preparation: I created a Google Doc which I printed out as a3 and double sided. For each REACH value, there were four sections: What is it? Definition in a sentence, What would happen if we did use (value)? and What would happen if we did not use  (value)? Each 'value' is stationed at a specific group of desks.

'Bus Stop' activity in action
Instructions 
  1. Students get into groups and begin at a specific 'station', where a large sheet of paper and some questions/prompts on it (or just one question/prompt if you want). 
  2. Students work collaboratively to record their responses to the first question. 
  3. After about 3-4 minutes, students get up and move to the next 'station'. 
  4. Then, students read what the previous group has written, and adds their own ideas to the first question. If they feel they can, they move to the second question on their new sheet. 
  5. This cycle continues until the teacher feels the students all have shared enough ideas and they have a good understanding of the topic.
  6. Then come together as a classroom to have a conversation about what they can remember about each value.

Class discussion of the values 

Students' suggestions of values
Since it was the first time using these class values, we also had a discussion about their general thoughts on each value, as well as values that they felt were also really important. It was interesting that some students felt like commitment was not that important, as it could be tied into responsibility and effort. Students also spoke about Attitude, Respect, Perseverance and Courage. I was very proud of my students for being able to think critically and come up with additional values that could be used in our classroom. As a side note, students will soon come up with a response to the values and propose the addition of Courage into our school values (which I think is awesome!).

What does each value 'look' like?

After the bus stop activity, the class came together to think about how we could show our school values in the classroom. Students had to share their ideas on a collaborative Padlet, which was displayed on our Activboard. For this task, I let students work in peers. I explained that students would need these ideas for the next task.

Made with Padlet

Walking the walk

Next, in groups of around 6, students were tasked with staging photographs which showed the students using each value. I also told them that they could edit them with speech and thought bubbles to make each value clear.

Some of my students photos to show our school values

Creating a DLO 

A DLO (Digital Learning Object) is Manaiakalani speak for 'creating something to show what you have learnt'. Since a lot of students haven't done this before, the school values lessons are a great way to introduce DLOs. Students work in groups of 3 to create a DLO that explains their understanding of the school values. For each value, students MUST

  • Have their own explanation of the value (use the bus stop activity and Padlet to help them)
  • Include a their photo that shows the value in action (they can add in thought or speech bubbles to make the value more explicit)
  • Explanation of why the value is important.

Quick plenary

As a second form of the 'bus stop' activity, students share what each value means. For this activity, cut up coloured paper (a different colour for each value) into strips. Again, I created stations for each of the values, and included a new value - courage, to the task. Students had to write their ideas in big letters so that it could be easily seen on the wall. 

This task is great because it serves as a plenary AND you can use it for your wall display, saving you from writing or typing them out yourself. Also, having the students write their ideas themselves makes the wall display more purposeful and meaningful.


Make it a wall display


Make some lettering, print out the photos and staple everything onto your wall. And there you have it, your first, purposeful and student-created wall display!

Our values wall display. Next to it is our class jobs and class dojo rewards and consequences (we came up with this as a class). Underneath those will be our class contract.

What's next?

Now you can use your lessons and wall display to help create your class contract or treaty. You can also refer back to your wall display to reinforce expectations in your classroom.


Thursday, 6 July 2017

Mid-year reflection

Where has the time gone?! It is crazy to think that we are half-way through the school year.  With the end of term two quickly approaching, it has been a good time to reflect on how it has been going.  

I created a Google Form to gain insight into the feelings and opinions of my learners.  I stressed the importance of my students taking their time and answering the questions as honestly as possible.  I explained that the purpose of the survey was to see what was working well in room six and what I could do better. It was very important that my kids felt comfortable to be completely honest. There is always room for improvement! 


The feedback I received was really heart-warming.  When asked the question Do you like being in room 6? the students had to rate between 1 and 5 (1 being no, and 5 being yes).  It was awesome to see that the general consensus was that my students enjoyed being in the class.  This question was followed by Why do you/ do you NOT like being in room 6? I did this because I wanted to know why my students liked or didn't like being in room 6.

Here are some of their responses: 

 I like being ing room 6 because we always learn new stuff everyday.

Because it is cool and I got a cool teacher...


I like being in room 6 because I have lots of friends and I learn more


It depends on what we do.


I do like being in room 6 because miss tries to make learning fun. She makes it so that we want to learn and no one is forcing us to learn.


We learn a lot of things 


because my teachers kind and I learn lots of things


I like room 6 because Miss D makes learning fun 


because we hardly get free time


I like room 6 because we can talk about our feeling about each other. Room 6 is the best classroom ever. Give things a go. 


I like being in Rm6 because I got a awesome teacher that helps me learn and achieve my goals now and for the future. 


I am so glad that my learners feel that learning is fun in room 6.  This is something I am always trying to keep in mind when planning. At the start of the year, most of my learners were well below national standard. This had meant that I have needed to be creative in my approach to teaching the class. I had wanted my class to be engaged and to enjoy learning. I love that many of my students feel they are learning heaps in my class. 


Another firm belief I have is that in order for kids to learn, they need to feel happy and safe (because who wants to learn in a class where they are miserable and uncomfortable?). I think the responses clearly show that I have created a safe, happy and positive classroom environment. This makes me incredibly happy. It is something I have continuously worked on throughout the year.  Whenever the wheels started to fall off, we would revisit the key ideas of discipline, collaboration and kindness. We also celebrate shift and small victories. I have chosen to focus on shift rather than national standards, and as a result I have seen my students confidence and self-efficacy rise. I believe these things have made a huge impact on my students - academically, socially and emotionally.


The responses in blue are the two students who rated 3 on the first question.  The student that said it depends on what he does is one of my top students.  This makes me wonder whether he is possibly bored/not challenged enough.  I am going to have a discussion with him so I can figure out what he would like from me.


Reading, writing and maths in room 6


I wanted to discover my students attitudes towards reading, writing and maths.  I asked them a series of questions, with likert scales and open-ended questions. As you can see, the majority of my class loves maths, and feels okay about reading and writing.  


I also asked my learners what they liked, didn't like and what I could do differently for reading, writing and maths.  The responses were mostly positive.  The main negatives I got was that they hate sitting on the floor for maths, and a lot of my students don't really like writing.  With respect to writing, I think I need to be a bit more innovative.

Here is the link to the survey results.


What's working well

  • Students feel safe and happy in room 6
  • Room 6 loves learning maths
  • lots of accelerated shift in achievement - yay!
  • An increase in self-efficacy and confidence in students learning and ability
  • Students enjoy using digital tools to help them learn (blog post coming soon)


What's next?


From the feedback I have recieved from my class I have formulated a few questions which will help to refine and improve my teaching


  • How can I use digital tools to increase engagement and understanding in writing?
  • How can I help to excite my learners about reading and writing? 
  • How can I engage one of my high achievers?
  • How can I continue to accelerate my learners achievement in maths?
  • How can I make sure that my use of digital tools and lessons are deliberate and effective? 

The past two terms have been challenging but so incredibly rewarding.  It is so great to be a part of my learners growth and development.  We have come a long way from day one and I am very proud of the effort that every student has put into their learning.  I am looking forward to seeing what the next half of the year brings!

Parting words from my learners...


Finish this sentence: I want Miss D to know....


I want to do basketball sometimes when we go out for PE.

that I love being in her class

that we like spending time with Miss D

"that I want to do more fitness and I don't like writing. sorry miss"

do fitness in the morning 

i don't wanna move classes because i like it in this class

How I love this class

What I am doing

i hate writing

she is the best teacher

That she is the best teacher ever off my life.

I want Miss D to know that she is the best and funny teacher I've ever had.

I want Miss D to know that no matter what she picks for next term for the class I support her 100%.

Battle of the Presentation Apps: Mentimeter vs Nearpod

I have been using Nearpod and Mentimeter religiously since I discovered them earlier in the year. At first, I leaned more towards Nearpod, mainly because it is free.  Unfortunately, the free version of Mentimeter only allows for up to 3 questions. Because of this, Nearpod became my first port of call.  However, I loved the word-cloud and scale features.

Recently I bit the bullet and a purchased a one-year subscription for Mentimeter. I am so glad that I did.  Now I feel like I can more accurately compare Mentimeter and Nearpod.  These are my thoughts about what sets Mentimeter and Nearpod apart from each other.


Mentimeter


Scale questions 


You can use this scale questions to gauge opinions or understandings of students. Mentimeter displays an average score (the circle) as well as the distribution of votes (just above the line). I find this to be a great visual way to show students responses.


Word clouds


I am a big fan of word clouds.  While I will always love AnswerGarden, I also love that Mentimeter also has a word cloud feature. It became really frustrating when I would create a presentation in Nearpod, but would really want to have a word cloud.  Word clouds are useful when you want learners to share and notice commonalities amongst student responses.


Rewindable


Downloaded report from Nearpod... not the greatest for some purposes
This is ultimately what drove me to purchase Mentimeter.  Sometimes we would have amazing lessons using Nearpod, but I wouldn't be able to capture those moments.  If I didn't take a screenshot of the results right then and there, the responses would be lost.  You can download a report, however it mostly displays participation rates.  The reports are not something you could use as a display or share with your class for later reference.


With Mentimeter, you can download each activity as a jpeg. You can also download the entire presentation as an Excel document or a PDF  I have often created shared folders in Google with all the downloaded jpegs from our lesson.  This has been helpful as this makes the learning rewindable.  Students are able to revisit the learning and see their responses. Students can also enter the code at a later date, and submit results.


Nearpod


Draw it


Draw it is an activity where students can annotate an image you upload.  Students can highlight, draw and add text.  I have found this to be very useful in both writing and math activities.  I use it for punctuation activities, paragraph correction and filling in the blank activities.


Collaborate


If you like platforms like Padlet and LinoIt, you will like the collaborate activity on Nearpod.   Students can add text as well as images onto a platform that closely resembles Padlet.  Students can also 'like' other peoples ideas, which they love.


Students opinion


I asked my class to rate the digital apps we use out of 5 (1 being no; 5 yes).  Here is what they had to say about Mentimeter and Nearpod:

 As you can see they are basically the same, although there is a slight preference for Nearpod. The graphs also show that majority of my class enjoys using these presentation tools, with only two students rating 1 and 2 for both Mentimeter and Nearpod.


So, what is the best?


It is pretty hard to choose between Nearpod and Mentimeter.  While they are both presentation apps, they can be used for different purposes.  I think Nearpod should have better download options, as I would like to be able to print off and display some of the awesome work we do on Nearpod. For Mentimeter, I think they should include a function similar to the Draw it activity on Mentimeter.  The only reason why I would choose Mentimeter over Nearpod is because of their options for downloading presentation results.


Overall, I couldn't recommend these presentation tools more highly.  They increase engagement and participation, compared to the traditional verbal Think-Pair-Share model. Both tools help students to feel comfortable and willing to share their ideas.  I also think the quality of ideas is a lot better.  This could be because they are talking more time to think and compose their responses.  Using these tools take longer than TPS, but you get a lot more out of your learners.


Saturday, 24 June 2017

Getting kids hyped about blogging: an update

A few weeks ago we looked at our blog stats and our global audiences.  Since then, my learners have become more interested in sharing their learning on their blogs. I really wanted to capture and keep their enthusiasm, so I have made a display for the room. 


1000 club


My kids were really excited to see their blog views as well as the countries. I decided to encourage this attitude, as well as a little competition.  I started off with just the '1000 club' - for students who have 1000 blog views or more. Since some of my students have only just got blogs, I decided to also include a '500 club'. I want my learners to feel proud of their blog views and celebrate their global audience.  


Top bloggers


I also wanted to encourage my learners to regularly post high quality blog posts.  I decided to run a weekly competition, using a tally system.  Every time a student posts a high quality blog post, they get one point.  The top blogger of the week gets a prize.  I have enlisted the help of 3 students to check the blog posts and record the points. My helpers check that the blog post clearly explains their learning, how they went and what they can do to improve. My helpers also check that the blog posts make sense. It has also been helpful to have helpers, as it can be hard to check every blog post before it is posted.

Infographics

At the bottom of the display I have included the students infographics about their global audience.

How it's going

Even though I have just started using this blog display, my learners are already so keen to get sharing their learning. In fact, after explaining how the top bloggers competition works, something crazy happened.  The bell went for morning tea, and no one moved.  Every student stayed and completed their blog posts. And it kept happening throughout the week.  Personally, I think a little extrinsic motivation can work wonders. When students write a blog post they are summarising, evaluating and reflecting on their learning. Even if they are motivated by the idea of a prize, they are still summarising, evaluating and reflecting on their learning, which I think is awesome. 

Next steps

I am hoping that my students enthusiasm towards blogging will continue.  It is important that I continue to stress the importance of quality blog posts, where students summarise, evaluate and reflect. I would like my learners to write more detail in their blog posts that is more than "I need to try harder".   I would like my learners to be more specific as this will help them to understand their next steps in learning.


Sunday, 28 May 2017

Student blogging: getting kids hyped about their global audience

I have been thinking about ways to encourage and motivate my learners to share their learning on their blogs.  This is something that is expected in Manaiakalani, however I feel that my learners are not really interested in it.  We have learnt about what to include in a blog post as well as writing blog comments. Now I have turned my focus on helping my learners to want to share their learning on their blogs (rather than me telling them).


Click here to view the Google Drawing that was used for this lesson

The motivator

A student at another Manaiakalani school received a comment from a famous author.
Before we started looking at our blog statistics we discussed the idea of a 'global audience'.  To motivate my learners, I shared with them a blog post from an ex-student from another school.  In her blog, she wrote about a recipe that was inspired from a book she had read. The author actually found her blog post and commented on it! This was a powerful way to illustrate that sharing your learning online can be exciting and gives you a global audience. We also discussed the importance of sharing enough detail in your blog post and using labels, as this helps people to discover posts.

Looking at our stats


First, we all had a look at our statistics. I had my own blogger dashboard up on the SMART board, and asked students to figure out where they could find out how many blog views they have. I was surprised with how pleased they were with how many views they had. We discussed that the more we shared, the more views we would get, as well as reiterating the importance of quality blog posts with labels.

Next, I asked them to see if they could figure out where to find out which countries the viewers were from.  After some investigating, learners hopped onto the Audience section and were surprised with the results. The students exclaimed over the countries. Some had visitors from more than 6 different countries.

Infographic time

Now that the learners were feeling motivated and proud of their blog statistics, it was time to share it on their blog. I decided to introduce the class to creating Infographics.  When we learnt about Infographics in the MDTA, I had created one about my global audience (read about it here). I used my infographic as a model of how they could present their statistics. My learners loved the look of the infographic and were eager to begin creating their own.  We used Canva, as I have found it to be easy to use and very effective. I also like how you can upload your own images for free on Canva, which is something that you can't do on other infographic creators.


Angel's blog post

Sione's infographic


Summing it up

I was a little nervous to introduce a new way to create a DLO, however this was the perfect opportunity.  The students loved using Canva, and some grasped the concept of using less text and symbols better than others.  This is something I can continue to work on. The class was really engaged in this lesson and they loved seeing their statistics. I do think they felt pretty empowered and motivated. I am hoping this will motivate them to want to share their learning (instead of me always telling them to). Stay tuned!

I also decided to create an updated infographic about my global audience, enjoy!


Using YouTube & Google Docs to Teach Recount Writing

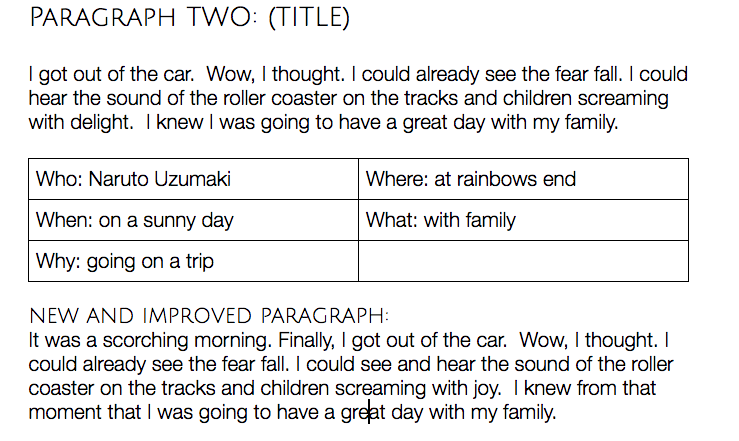
For writing this term, our main focus is on Recounts.  I am trying to make my lessons more engaging and meaningful for my learners.  After using YouTube for poetry & learning about acceptance, I decided to use videos as inspiration for recount writing.

We have covered the language features used in recounts and we have learnt the acronym TREE to remember the structure of a recount. So this week we have narrowed our focus to the first paragraph of a recount - the 'Reveal' paragraph.

I chose to break my teaching down like this as I have found that the majority of my class struggles with writing. My thinking is that breaking down a recount into more manageable chunks will allow them to have a deeper understanding of each section. I also choose to break up my class into two groups.   This is because I want to make sure everyone is participating in the sessions.  Oftentimes, certain learners will share and contribute while others will remain quiet.

This week we used Google Docs and YouTube to learn more about the 'Reveal' Paragraph.  To start with we discussed the key components of a reveal paragraph - a hook to grab the reader's attention and the 5ws. Then we had a go at identifying the Ws and the hook in an exemplar paragraph.

First up, a vlog!


click here go to group 1's collaborative Google Doc
Then, we turned to the interesting bit! We used Google Docs as an online form of a modelling book.  Each student had their Chromebook and editing rights.  First we had a go at writing a reveal paragraph as a class.  I chose to use a vlog about her first bungy jumping experience.  We watched the first minute and discussed what we saw. We brainstormed as many answers to the 5ws as we could.  Then, we worked together to write our paragraph. Lastly, we added our 'hook'. After sharing each other's 'hooks' we combined the best ones and added to the beginning of our paragraph.

click here go to group 2's collaborative Google Doc

The Present: pair paragraphs


Next the students worked in pairs to write another 'Reveal' paragraph. I chose to use The Present. I felt that the students would find it easier to write about The Present because we have already used The Present to learn about acceptance (& more). Since we were only focussing on a 'Reveal' paragraph, we only used the first 30 seconds. Again, the pairs brainstormed 5ws and then began writing their paragraphs. I decided to get my students to choose the Ws that they felt was important with setting the scene.  I have found that sometimes recounts can get a little boring, as there is too much focus on addressing all the Ws (ie On the 21st of June on a cold afternoon, I was playing PlayStation... boring!). Instead, we chose fewer Ws and also elaborated on some of  ideas.


Going it alone


Lastly, students had a go at writing their own Reveal paragraphs. I was able to get up to this with G1 but am planning on finishing this lesson with G2 next week.  I was pleased with the quality of the paragraphs.  Students were also adding in interesting hooks, which helped to grab the reader's attention.


Pair/individual follow up task


The follow up task was Revealing Paragraphs. This involved a number of steps.  First, students had to unpack a reveal paragraph by identifying the Ws. Next, they added in an interesting title.  Lastly they found ways to improve the paragraphs by making them more interesting by adding in a hook and some extra description.


Summing it up

Overall I am pleased with how this went.  Both groups were able to create some interesting reveal paragraphs.  I think using YouTube really helped, especially with my lower writers. It was also important that the students planned out the Ws before writing their paragraphs.

Using Google Docs was useful as all students could collaborate on the same document during our guided writing session.  I had the Doc projected up on the SMART board, so was able to discuss the paragraphs as well as address any errors. It will also be something that we will be able to return to, unlike writing on whiteboards that will disappear after the lesson.

I did notice that my class struggles with correctly using dialogue.  I will work on this next week before I continue onto teaching the 'Events' section of a recount.

Wherever possible, I will definitely be using Google Docs as a form of modelling books as well as using YouTube to help students in writing.


Monday, 23 January 2017

Summer School '17: Digital Tools I am Excited to Try

This week I have not only come away with lots of knowledge about learning theories, pedagogies, and affordances related to digital technologies, but also an array of apps and programmes that can enhance the learning. It is easy to get stuck in your ways and use the same tools, so I'm glad I learnt about some tools and their uses in the classroom.  Here are some tools which I am excited to try this year in my classroom.

Answer Garden


I came across AnswerGarden thanks to Ashley and her activity on Growth Mindset. It is a great little app that could be used in many ways.  If you want a smaller version, or want to conduct a poll where participants can't see the answers, use MicroGarden instead. This can be done when selecting 'share' on your AnswerGarden. If you want to share your finished AnswerGarden you can export the data to Wordle or Tagxedo, which creates pretty Word Clouds you can add on your blog, or print out.  If you want to read more about AnswerGarden, read this.


Mentimeter


Latai introduced me to Mentimenter, and I am so glad she did! It is her favourite app and I can definitely see why. It will be a great tool to use to check understandings, share ideas as well as serve as a brain break. There are many pre-made examples from different categories too.  This tool can be used by teachers, as well as students.  Its really easy to use, and getting your learners onto your Mentimeter is easy. All they need to do is jump onto menti.com log on to and put in your code.


Special mentions

LinoIt


LinoIt is a collaborative multi-media sticky note tool which Georgia suggested the MDTA cohort to use. I am already quite a fan of Padlet, since it is pretty user-friendly and offers a lot of the same things as LinoIt.  Both tools allow for collaboration and you can add in images, videos and other links.  


Here are a few aspects which set LinoIt apart from similar tools.
  • Different coloured sticky's - this can be helpful if you want to colour code ideas under different subgroups.
  • Anyone can move a sticky note - unlike other tools, which only allow the poster to move their sticky note.
  • Tagging feature - the tags are like hashtags, which helps you quickly see sticky notes which have the same tags. If you click on a tag, the sticky notes with the same tag are visible, while the others are blacked out.
As with similar tools, LinoIt has many uses in the classroom.  Click here to read an exhaustive list. If you want so see an example of LinoIt's use, check out Georgia's LinoIt. Her students have colour-coded their sticky notes and used tags to share what they know about the Olympic Values. They have also used various modes to show their understanding (images, video clips and text).

Trello


Trello was introduced to me by my lecturer who used it to show the outline for each day. Trello is a collaborative tool which helps you organise your projects using a board with lists and cards. It shows you what is being worked on, who is working on it and what is completed.  You can organise your board with a series of lists, and can add 'cards' under each list. For each card, you can add labels, due dates and attachments. Make your Trello a collaborative document by adding members. You can see what group members (and you) have done by looking at the 'activity' section, which shows the board's history. You can learn more about Trello here.

This tool can be used by both teachers and students.  I am keen to use Trello as an online to-do list to ensure I stay on top of my workload this year.  I would also like to encourage my learners to use this tool when working collaboratively in groups.


I am looking forward to seeing how my new classroom responds to the new digital tools I will be using in my teaching!


Friday, 19 August 2016

Grow Your PLN with Twitter!

Today's learning was all about the affordances of Twitter an educator.  James Hopkins joined us via Google Hangouts to chat to us about his journey with Twitter.  James spoke about Twitter being the catalyst behind his 'year of change'.  He firmly believes that he learnt far more during his first 10 months of using Twitter, than he had during his 10 year teaching career. Check the presentation James shared via screensharing during our Google Hangout to find more information about James' journey and the affordances of Twitter.

Why use Twitter?

  • Find and share resources
  • Connect with like-minded people
  • Find 'critical friends' who will provide professional and honest feedback
  • Twitter is accessible anytime, anywhere, to suit your needs and preferences
  • Soundboard your ideas

#MDTAchat


Following James' thought provoking discussion, the MDTA participated in our first Twitter chat, using the hashtag #MDTAchat.  Anne gave us a series of provocations and questions, which we had to answer via Twitter under the hashtag #MDTAchat.  We also had to reply to each other's tweets to keep the conversation going.


Find me on Twitter!

Thursday, 11 August 2016

Infographics: a fun way to display data

Unfortunately I was absent during last Friday's Digital Immersion day, recovering from a procedure on my jaw. After looking at Dorothy's presentation and blog post,  and the blog posts from the rest of the MDTA team, I knew I missed out on an awesome learning opportunity!


Creating to share with infographics

The create aspect of the day was about creating to share using infographics. Infographics are a visual and fun way to present statistics.  It goes without saying that people respond better to visuals than a lengthy piece of writing.  The average human attention span is only 8 seconds, and our brains process visuals 60,000 times faster than text.  This makes me question who wouldn't want to use infographics to show data!


Having a go


I created an infographic to display the data from my professional blog. There were so many infographic creator sites online, but I chose to use Canva.  Instead of using a template I decided to create mine from scratch as I had an idea of how I wanted to lay out my infographic.  There were lots of icons, images, charts and shapes to choose from, but the only thing that bothered me was that the charts were not editable, I had wanted to use a Pie Graph to display the countries of my visitors, however I discovered it was a set image that could not be edited.  I had heard that Piktochart allows you to edit your charts, which I will keep in mind for the future.


Why use it in the classroom?


  • Fun way to display information which would normally be in the form of lengthy sentences.  
  • Infographics grabs readers attention through its use of images and colour and short pieces of writing. 
  • You don't have to be an artist or very creative to feel successful in your creation.
  • You can choose from a wide variety of templates to get you going and get some inspiration.

Student's perspective

I actually finished creating this infographic whilst supervising a group of GIS students at a chess tournament.  When they saw what I was creating they were all really interested in what I was creating.  They liked the way it looked and had said they would like to do something like this in their learning.  One of the students said an infographic about their blog posts would be a cool thing to create and have on their blogs and classroom. Such an activity could empower, excite and motivate my learners to continue to share their learning on their blog. I am looking forward to finding more ways to use infographics in the classroom.

Sunday, 6 March 2016

Digital Immersion: Critical Thinking, Sites 101 & Multi-Modal Learning


Critical Thinking with Caleb Allison

Today during Digital Immersion we were fortunate to have a visit from MDTA Alumni and Tamaki College teacher Caleb Allison.  He spoke about building critical thinking in our learners within the context of Current Events.  It has been noted that teachers are not making the most of their teaching time to challenge students to think more critically.  Critical thinking involves challenging students to think beyond themselves.  Caleb uses SOLO Taxonomy in his Current Events lessons to encourage critical thinking.  Caleb's Current Events programme got me thinking about how I could implement something similar into my reading programme.  I am looking forward to giving it a go.

Here is an infographic I created which shows the progression from surface to critical thinking about Current Events, using SOLO Taxonomy.

Sites 101

The digital component of the day was about learning the basics of creating and designing a Google Site.  We each created a 'sandpit' site, where we created different pages, played with the layout and adjusted the settings for our site.  It was a great opportunity to develop our understandings of Google Sites.


Multi-Modal Learning

In the afternoon we had to create a multi-modal learning site, which would help learners to explore and develop their understandings of a fairy-tale. Multi-modal learning is related to Gardener's theory of 'Multiple Intelligences'.  I chose Three Little Pigs and set out to find resources which would cater to all student's needs and learning preferences. I found a YouTube clip, a story that had a 'read aloud' function, a YouTube clip featuring a student's summary, a text version and a short summary of Three Little Pigs.  Here is a screenshot of my site:

Here is a screenshot of my multi-modal site for the fairytale Three Little Pigs.
 I am looking forward to implementing what I have learnt today into my classroom.

Friday, 19 February 2016

Digital Immersion: Day Two

Our second Digital Immersion day started with a little learning about the origins of Manaiakalani.  Dorothy talked us through Manaiakalani's conception,  beginning days and where the cluster is at now.  Once again I was reminded of how lucky I am to be a part of an innovative cluster that is making a real difference to the lives of our learners. 


Today's digital learning was about Google Forms and Google Sheets.  Again this week I was surprised at how little I knew about these apps.  Dorothy talked us through the Self-Paced Check with Dave Winter. Dave's Google Sheet was really useful as we could go through the YouTube clips at our own pace (as the name suggests) and fill in any knowledge gaps we had about Google Spreadsheets.


Next up we learnt about Google Forms. We learnt by doing as Dorothy guided us through the process of creating our own Google Form. I created mine on Sentence Structures, as this is a lesson which I enjoy and am passionate about teaching. We also learnt about the Google Sheet's add-on Flubaroo. This add-on enables you to transfer your responses from your Google Form onto a Google Spreadsheet. You can then grade your responses. Here is a Google Draw I created about my learning: