Sunday, 28 May 2017

Using YouTube & Google Docs to Teach Recount Writing

For writing this term, our main focus is on Recounts.  I am trying to make my lessons more engaging and meaningful for my learners.  After using YouTube for poetry & learning about acceptance, I decided to use videos as inspiration for recount writing.

We have covered the language features used in recounts and we have learnt the acronym TREE to remember the structure of a recount. So this week we have narrowed our focus to the first paragraph of a recount - the 'Reveal' paragraph.

I chose to break my teaching down like this as I have found that the majority of my class struggles with writing. My thinking is that breaking down a recount into more manageable chunks will allow them to have a deeper understanding of each section. I also choose to break up my class into two groups.   This is because I want to make sure everyone is participating in the sessions.  Oftentimes, certain learners will share and contribute while others will remain quiet.

This week we used Google Docs and YouTube to learn more about the 'Reveal' Paragraph.  To start with we discussed the key components of a reveal paragraph - a hook to grab the reader's attention and the 5ws. Then we had a go at identifying the Ws and the hook in an exemplar paragraph.

First up, a vlog!


click here go to group 1's collaborative Google Doc
Then, we turned to the interesting bit! We used Google Docs as an online form of a modelling book.  Each student had their Chromebook and editing rights.  First we had a go at writing a reveal paragraph as a class.  I chose to use a vlog about her first bungy jumping experience.  We watched the first minute and discussed what we saw. We brainstormed as many answers to the 5ws as we could.  Then, we worked together to write our paragraph. Lastly, we added our 'hook'. After sharing each other's 'hooks' we combined the best ones and added to the beginning of our paragraph.

click here go to group 2's collaborative Google Doc

The Present: pair paragraphs


Next the students worked in pairs to write another 'Reveal' paragraph. I chose to use The Present. I felt that the students would find it easier to write about The Present because we have already used The Present to learn about acceptance (& more). Since we were only focussing on a 'Reveal' paragraph, we only used the first 30 seconds. Again, the pairs brainstormed 5ws and then began writing their paragraphs. I decided to get my students to choose the Ws that they felt was important with setting the scene.  I have found that sometimes recounts can get a little boring, as there is too much focus on addressing all the Ws (ie On the 21st of June on a cold afternoon, I was playing PlayStation... boring!). Instead, we chose fewer Ws and also elaborated on some of  ideas.


Going it alone


Lastly, students had a go at writing their own Reveal paragraphs. I was able to get up to this with G1 but am planning on finishing this lesson with G2 next week.  I was pleased with the quality of the paragraphs.  Students were also adding in interesting hooks, which helped to grab the reader's attention.


Pair/individual follow up task


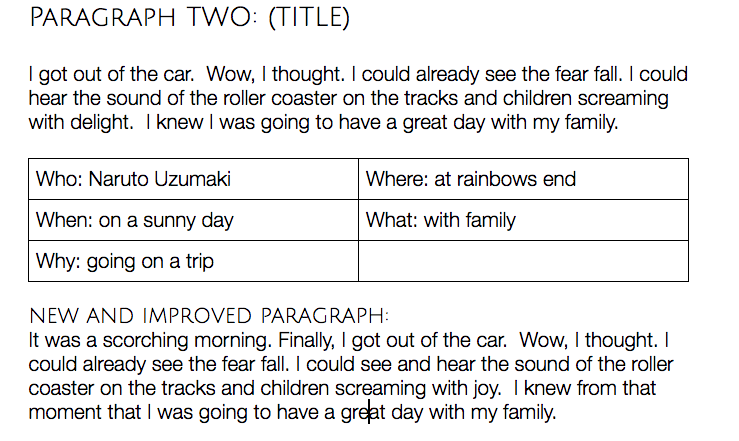
The follow up task was Revealing Paragraphs. This involved a number of steps.  First, students had to unpack a reveal paragraph by identifying the Ws. Next, they added in an interesting title.  Lastly they found ways to improve the paragraphs by making them more interesting by adding in a hook and some extra description.




Summing it up

Overall I am pleased with how this went.  Both groups were able to create some interesting reveal paragraphs.  I think using YouTube really helped, especially with my lower writers. It was also important that the students planned out the Ws before writing their paragraphs.

Using Google Docs was useful as all students could collaborate on the same document during our guided writing session.  I had the Doc projected up on the SMART board, so was able to discuss the paragraphs as well as address any errors. It will also be something that we will be able to return to, unlike writing on whiteboards that will disappear after the lesson.

I did notice that my class struggles with correctly using dialogue.  I will work on this next week before I continue onto teaching the 'Events' section of a recount.

Wherever possible, I will definitely be using Google Docs as a form of modelling books as well as using YouTube to help students in writing.


Monday, 1 May 2017

Life Lessons with Short Films & Nearpod

Last term I did an awesome lesson which used two of my favourite apps - Youtube and Nearpod.  As the term was coming to an end, I felt that my students needed to be reminded of the importance of acceptance, kindness, non-judgement and tolerance.  I was talking to one of my workmates, not sure of what to do on a Friday. She said that she often used YouTube as a starting point for writing.  She uses CGI short film animations.  This got me thinking about how I could use film to help teach some concepts that I felt my learners were forgetting.  Then I remembered The Present.

The Clip


The Present is a very powerful clip that my kids loved! We watched it twice before beginning our Nearpod. I chose to let it run through without stopping or asking questions because I wanted them to take in the film as a whole.

Retelling

My first activity on Nearpod was using 'Collaborate' where students had to retell the most important bits of the film.  I was impressed by the level of engagement.  As always, I use their ideas as a starting point for further discussion/elaboration.


Inferring

The next activity was an 'Open Ended Question'. This was an inference question, which asked students to think about why the mum wanted to give his son a present. The next activity was a 'Collaborate' asking Why did the boy get so angry when he noticed what was wrong with the dog? The students were able to come up with some insightful ideas for both questions.


Evaluating


Next, students shared their opinions on the boys reaction to dog, and whether it was right or wrong.


Author's Purpose

Lastly, students shared their ideas about what the message was that the author/creator was trying to tell their audience.


Creating a DLO

After all the discussion that was drawn from the Nearpod activity, my learners created DLOs to share their learning.  I let them create anything they wanted. They created Comics, Google Drawings, wrote poems, recounts and wrote explanation pieces.


Summing it up


Overall I was pretty pleased with how this lesson went.  My learners were really engaged and it created a great opportunity to discuss being grateful, kind and non-judgemental. They loved the film and Nearpod helped them to feel eager to share their ideas with the class.  Creating a DLO was a great way for me to see what they took away from the lesson. It was cool to see the broad range of DLOs created. 

Thursday, 16 March 2017

Creating Our Own Quizzes!

My learners love of Nearpod

I have been using Nearpod as a way of engaging my learners and building on their knowledge of stormwater pollution. They absolutely love it.  Whenever we use Nearpod the students are so much more engaged and eager to participate in the learning.  We have done a lot of learning so far about stormwater pollution and our local river - Omaru River.  I wanted to come up with an exciting way for my learners to show me what they have learnt so far.   


Since they love taking part in quiz-type presentations like Nearpod, I decided that they could create their own quizzes to show me what they have learnt.

My learners loved this idea and immediately began creating their own tasks.  Since Nearpod is actually created for educators, I gave students two platforms to choose from:Kahoot! and Socrative.  All students ended up choosing Kahoot! because it is very user friendly.


Creating Quizzes

It was interesting to see the types of questions and answers my learners were creating.  I think creating a quiz added an extra element of difficulty. Not only did they have to come up with a question and an answer, but also other plausible but incorrect answers too. My learners seemed to enjoy the challenge though!  When some students became stuck I modelled a couple of example questions on the board.  This helped to make a connection between what they had learnt and how they could use it in a question/answer form for the quiz.


Quiz time

After looking through the quizzes, I am pretty pleased with how they turned out.  They show that my learners have actually learnt a lot about stormwater pollution and our river.  The next part of the activity is to have a go at eachothers quizzes.  Stay tuned to see how the learners respond to having a go at eachothers quizzes!

Monday, 6 March 2017

Digital Tools my Learners are Loving

I can't quite believe I am almost half-way through my first term of teaching in my own classroom!  It feels like time has flown by, but it also feels like yesterday that I met my classroom for the first time.  However, the students have grown to be a lot more confident using digital tools - which is very different to how they came into my classroom.

I was super excited to begin teaching my learners in a way they hadn't learnt before.  Luckily, my learners really took to using digital tools - so much so, that they get pretty thrown when we do anything on paper.

Here are my top three tools/sites that my learners are loving.

Nearpod

I've wrote about it before, and I am still a massive fan of Nearpod.  My learners absolutely love using it.  They go from reluctant, shy learners to confident collaborators.  So far I have used Nearpod to gauge students Prior Knowledge of explanations, as well as inquiry lessons about stormwater pollution and the health of rivers.  I have been using a range of its features, such as polls, quizzes, open-ended questions and collaborate (like Padlet and LinoIt).  What is so great about Nearpod is that you can add as many slides and activities as you want.  I often have slide with an image to start conversation, followed by a poll or quiz, and then an open-ended question or collaborate. Another cool feature that my learners love is the ability to 'like' posts on collaborative activities.


One day I discovered I accidentally erased the student's contributions to a Nearpod.  Instead, I got my learners to participate in a quick bus stop rotation, where they had to share their ideas about a photograph to do with stormwater pollution and rivers.  The content of the lesson was basically the same as what would have been done with Nearpod.  However, the students level of engagement was completely different.  It was interesting that as soon as we got back to using digital tools (Mentimeter this time) the students perked up and were engaged once again.  This shows the power that tools like Nearpod and Mentimeter have on my learners. They are are highly engaging and my learners love them!

Answergarden

This was suggested by Ashley during Summer School and I wrote about it in a previous blog post. 5 weeks down and my learners are still loving Answergarden.  I have used Answergarden when creating a class contract, getting prior knowledge, during writing lessons and 40 character summaries in inquiry.


I think this tool works for a number of reasons.  Firstly, it encourages students to summarise and be succinct.  It is a great way to see the ideas that are common amongst a group or class.  Learner's also find it much easier to share their ideas on Answergarden instead of verbally.  While it's easier for them to share, learners are still sharing their ideas with their peers before they post, so they still are sharing their ideas verbally.


Prodigy

I discovered Prodigy from a Facebook post on the NZ Teachers (Primary) page. It is a maths site where students are wizards and battle pets and other characters. In order to attack, students must correctly answer a maths question.  Teachers can assign certain topics and decide how long the topic will run for.  You also can track your students achievements and the topics that they are struggling with.


Assign topics or strands for your students to work on

Check students achievements and gaps


I was so surprised with how much my learners loved using this site - so much so, that they were using it during their 'free time' at Tech (at Tamaki College).  One afternoon, with a change of plans I suddenly had the last block free.  I decided to let the students pick between finishing three tasks - Hour of Code, an all about me activity or Prodigy.  All but two students choose to go on Prodigy. Further, learners stayed on the site the whole block! No cheeky changes of tabs or going on other sites.

Summing it up


I use Nearpod as a way to expand on my students ideas.  It serves as a conversation starter and allows for my learners to confidently share their ideas. They love seeing the poll and quiz results, as well as watching their ideas on collaborate get 'likes'.

Answergarden is an awesome way to identify common thoughts/ideas around a topic.  It is also a useful tool to help learners to summarise and be succinct.

Prodigy has added some extra excitement to my mathematics rotation. The 'game-like' features have hooked my learners in.  The 'Reporting' section helps me to see where gaps are in my learners knowledge.


All in all, I'm really enjoying using digital tools to help engage learners and encourage collaboration. I will definitely continue to hunt for new and exciting tools to try in my classroom.

Thursday, 9 February 2017

I Found a New Digital Tool & it is AWESOME!

So a few weeks ago I wrote a blog post about some digital tools that I'd newly discovered and was keen to use in my classroom.  One of those mentioned was Mentimeter.  It sounded great and I was so excited to use it.  I signed up and began creating my first interactive presentation.  I created two activities, and then it told me I needed to pay a subscription in order to add more.  Needless to say I was super gutted... and seriously considering paying. Instead, I did a quick Google search for similar digital tools.  I couldn't really find anything.

I randomly stumbled upon a digital tool when reading Jennifer Gonzalez's blog post about digital tools to use this year.  And I am so glad I did because I discovered Nearpod! It was Jennifer's number one pick, and I can see why!

Why Nearpod is so Great


As far as I can tell, Nearpod is basically free.  You can pay a subscription if you want even more features (collaborate, fill in the blanks and memory test), but the free version lets you create 'live lessons', using quizzes, open-ended questions, and polls.  Also, unlike Mentimeter, you can add in heaps of activities on one presentation.

It's really easy to use.  You create a new presentation and choose between creating a slide with content, web content of an activity.


The 'live version' of Nearpod is the free one, and it is the best option.  This is one that the teacher uses during a teaching session.  The difference between the live and student paced lesson is that the teacher controls the live version.

My Nearpod presentation

I created a Nearpod presentation to introduce my learners to explanation texts. The purpose was to discover whether my learners could identify an explanation text, and if they could explain why/why not a text was an explanation.

In my presentation was:

  • A slide with a screenshot of a text type 
  • A quiz, asking "Is this an explanation?"
  • An open ended question, asking "Why is this/is this NOT an explanation?"
So for every text type, there were three slides.  I had about 6 different text types (each with the screenshot, quiz and open-ended question).

Because I wanted my learners to collaborate, they were put in groups of 3 or 4. This meant that they could share their ideas before deciding on their answers.

How it went

I was surprised with how enthusiastic my learners were during this lesson! I knew it would help them to be engaged, but they were also super excited by the task.   Even my most reluctant learners were super engaged and wanted to see whether they got the quiz questions correct. They liked that they could see what each other got, and there were no 

Teacher's screen for quiz
Students' screen for the quiz

Teacher's screen for open-ended question

Students' screen for open-ended question


I realised that if the teacher's display was always on, then the students would see who got the right answers.  This could be a problem, as some students could wait to see what the other groups said and then choose the correct answer.  To avoid this, when it was the quiz time, I changed my tab to a student's screen.


Final thoughts

I think Nearpod might be my new favourite digital tool.  The level of engagement and enthusiasm it brought to my lesson was unlike any other tool I have used.  It was a great way to see what my learners already knew about explanations and to begin to form some ideas about the structure, content and features of explanation writing.  The students were motivated to take part, which was a massive win, as I have some reluctant learners.  I could also tell that they felt proud and very pleased with themselves, when they saw that they got a correct answer.

I will definitely be using this tool again. Students could even create their own presentations to show what they have learnt.


Sunday, 5 February 2017

Creating a Collaborative Classroom: Team Building

This week I have focussed on creating a safe, inclusive and happy classroom environment.  One of my favourite tasks so far would have to be the one we completed on Friday.

Can You Draw It?

I'm not sure of this games exact name, but it is a variation of this team building exercise, found on Pinterest. This is what you need:
  • Groups of four - five is ok too, if one student is the instructor.
  • A felt tip pen with two strings tied to it, creating four pieces of string.
  • A2 or A3 paper for each group
  • A print out of a simple drawing
All you need: A felt-tip pen with two strings tied, a simple drawing and some A2 newsprint paper

Instructions

  1.  Each group member holds a piece of string.  They each have a piece of A2 paper and a print out of a simple drawing.
  2. The group has to work together to replicate the simple drawing.
  3. Students must be holding onto the string, they cannot touch the pen.
The group with the best drawing wins!


This activity was lots of fun and pretty hilarious.  There was laughter and a bit of frustration, as teams worked together to draw the image.


Although this activity was meant to be fun, there were some more serious lessons which underpinned the students success.  The students had to work together. Everyone had to help out and take part.  If one group member decided not to try, then the pen would not stay upright and the team would struggle.


Moral of the lesson


Everyone must work together, if one person doesn't then it won't work.  This is the case for collaborative work.  It is crucial that everybody pitches in and helps out. In order to succeed, everyone needs to play a role and contribute to the group.

Once students had calmed down from the excitement, we had a discussion about what the point of this task was.  I was happy that they could relay that it was about the importance teamwork and everyone doing their bit.


Next week...

Next week I am planning to continue setting team building challenges for my classroom.  This is helping my learners to feel safe and confident in my classroom.  It is also building a collaborative environment - which is what my learners asked for. I am looking forward to watching my learners progress from shy to confident classmates.


Saturday, 4 February 2017

Creating a Collaborative Classroom: Day One & Two

It is always hard starting the new year with a new teacher and new classmates.  So this week I have focussed on creating a collaborative and inclusive classroom environment.  Whilst it started off a little slowly (with technical road bumps and very shy students), I am starting to see and hear collaboration happening in my classroom - and only on day two!

Key Competencies - TRUMP

My first day was focussed on learning more about the Key Competencies.  The NZ Curriculum says it is important, and our learners are even graded on the KC's in their report.  Despite this, students generally do not know what they are and what they mean.  Today we focussed on unpacking each of the Key Competencies: Thinking, Relating to Others, Using Language, Symbols and Text, Managing Self and Participating and Contributing.


Finding out their PK

To start with, I wanted to get the students Prior Knowledge, so they participated in a quick bus stop rotation.  This was when they shared what they thought each word meant.  This was supposed to be done on Google Docs, but we had no internet at the time.  It was great to see that my learners already knew quite a lot!


Students PK from the Bus Stop rotation

Unpacking as a Class

After this, we unpacked each one as a class. We drew on their ideas from the bus stop activity, and think-pair-shared our ideas of what each KC meant.  After this, we discussed how we could show each KC.  I helped them think about this by asking them "If the Principal walked into our classroom, what would he see if you were ___".  Asking what people would see helped my learners to understand what each KC means and 'looks like'.  To start with my learners were hesitant to share, but after lots of encouragement and positivity, there was a lot more talking happening amongst the table groups.


Time to get Creative!
Student's photographs of them showing the Key Competencies

After sharing our ideas and recording them on the board (there was no internet, so no LinoIt! 😞 ), my learners were given the challenge of taking photographs of them showing each of the 5 KC's.  They seemed to enjoy this part.  The boys and girls worked together to take photographs.  They were sharing their ideas and starting to relax with each other. 


I created a wall display which used their definitions and ideas, as well as their photographs. This will serve as a visual reminder of the ways my learners are expected to behave. Because it is their ideas and their photographs on the wall, there is more accountability for them to stick to rules and show the KCs.
Our wall display with the students own definitions, ideas and photographs

Class Contract

The next day we created our class contract.  I started the lesson off by revisiting the KC's and asking why it is important to know and use them.  For the class contract, I decided to use AnswerGarden. The question on the first AnswerGarden was "What helps you learn?".  AnswerGarden was a great tool to use because the ideas that were repeated would grow bigger.  This was a great way to see at a glance what was important to my classroom.  Learners also collaborated on an AnswerGarden asking "What DOESN'T help you learn?".  Both questions were incredibly insightful and gave us lots of things to draw on for our discussion. 


AnswerGarden for "What helps you learn?" click here access the AnswerGarden

AnswerGarden for "What DOESN'T help you learn?" click here access the AnswerGarden


AnswerGarden was a great tool to use to get students to share their ideas.  It was an easy way to see what was important to my learners.  I also think that it helped the students to share their ideas because their names were not attached to the ideas they posted.  It was also reassuring for them to notice that many others had said the same thing (when their ideas grew bigger, or from noticing someone had said something similar).  I would definitely use this tool again with my classroom.

Class Discussion

Following the AnswerGarden, the class choose the most important words/phrases relating to what helps them learn or not learn.  Using Think Pair Share, we discussed the importance of each of the ideas as a class.  I choose to keep relating their rules back to the idea of us wanting to create a safe, inclusive and happy environment.  Next, I got the students to form small groups and write 6 rules for the classroom.  


Lastly, we shared our rules, mixed them together and adapted them to create a set of rules that we were all happy with. It was great to see my students gaining more confidence, with some of my shyest students sharing their rules.

Wall Display of Class Contract

I created the class contract on Canva. In hindsight, I could have gotten the learners to help choose the template, colours and fonts (this would have given them more ownership of their contract).  


Instead of getting the students signatures or hand prints, I chose to use puzzle pieces.  Before getting the students to make their puzzle piece, we discussed the importance of the contract and adding their puzzle piece.

Where to next...

Overall I am pretty pleased with how the first two days have gone.  I will need to keep going over/referring to our class contract and our KC wall to reinforce our class expectations.  Despite their shyness, the majority of students (17/19) said they preferred working with others in groups.  So I need to continue to encourage learners to work together and share their ideas. One thing I noticed was the reluctance to work with the opposite gender.  This is something I need to keep in mind.  I will continue to encourage my learners to collaborate and celebrate when they do so.  They have already showed me that they can do so much more when they work together. I was also really happy with the way they have grasped using digital tools like AnswerGarden. I need to continue to find new and engaging tools that will allow my learners to feel confident to share their ideas with one another.